Setup Swagger in Nextjs App Router
Swagger is an Open Source set of rules, specifications, and tools for developing and describing RESTful APIs. The Swagger allows developers to create interactive, machine and human-readable API documentation. It also comes with a playground where we can try out actual APIs. In this article, we will see how to set up Swagger in the Nextjs App router.
Initial project setup, create a Nextjs project
npx create-next-app@latestYou'll be prompted with multiple options, choose whatever works for you. I picked typescript. Because I prefer using it. Also, the examples shown here are using TypeScript as default but it can also work with JavaScript.
Once the project is initiated, We can now install the following dependencies.
Based on your package manager you can install it. This can be done with npm, yarn, pnpm, bun. I'm using pnpm.
pnpm install next-swagger-doc swagger-ui-reactOnce installed, create a new folder called lib next to your `package.json` file.
Inside it, create a file called swagger.ts and paste the below content
import { createSwaggerSpec } from 'next-swagger-doc';

export const getApiDocs = async () => {
  const spec = createSwaggerSpec({
    apiFolder: 'app/api',
    definition: {
      openapi: '3.0.0',
      info: {
        title: 'API Docs',
        version: '1.0.0',
      },
      components: {
        securitySchemes: {
          BearerAuth: {
            type: 'http',
            scheme: 'bearer',
            bearerFormat: 'JWT',
          },
        },
      },
      security: [],
      tags: [
        {
          name: 'Hello',
        },
      ],
    },
  });
  return spec;
};
This is like a specification/configuration file for setting up Swagger. You can edit the name of the docs, set the type of authentication, and edit tags. Also in the apiFolder property make sure it's pointed to the API routes folder.
Once it's done, inside the api folder create a filename called page.tsx and paste the below code.
import { Metadata } from 'next';
import { getApiDocs } from '../../lib/swagger';
import ReactSwagger from '../components/swagger';

export const metadata: Metadata = {
  title: 'API Docs',
  description: 'API Documentation with Swagger for Nextjs',
};

export default async function IndexPage() {
  const spec = await getApiDocs();
  return (
    <section className="container">
      <ReactSwagger spec={spec} />
    </section>
  );
}
as you can see it's importing the swagger file we just created along with the component called ReactSwagger which we have to create now.
Inside the app directory create a new folder called components and inside it create a new file called swagger.tsx Here is where we actually import the installed package to render the Swagger UI. Here is the code for that.
'use client';

import SwaggerUI from 'swagger-ui-react';
import 'swagger-ui-react/swagger-ui.css';

type Props = {
  spec: Record<string, any>;
};

function ReactSwagger({ spec }: Props) {
  return <SwaggerUI spec={spec} />;
}

export default ReactSwagger;
As you can see we have marked this component as use client since it's a client component.
Now time to set up our API endpoint.
Inside the app/api directory I'll create a new folder called hello and a file name route.ts with the following code.
import { NextApiRequest, NextApiResponse } from 'next';
import { NextResponse } from 'next/server';

/**
 * @swagger
 * /api/hello:
 *   get:
 *     description: Returns the hello world
 *     tags:
 *      - Hello
 *     responses:
 *       200:
 *         description: hello world
 */
export async function GET(req: Request) {
  return NextResponse.json(
    {
      message: 'hello world',
    },
    {
      status: 200,
    }
  );
}
This is a simple API route that returns a hello world message. If you notice closely, we have made a JSDoc-like comment along with the decorator called @swagger and what the expected response looks like.
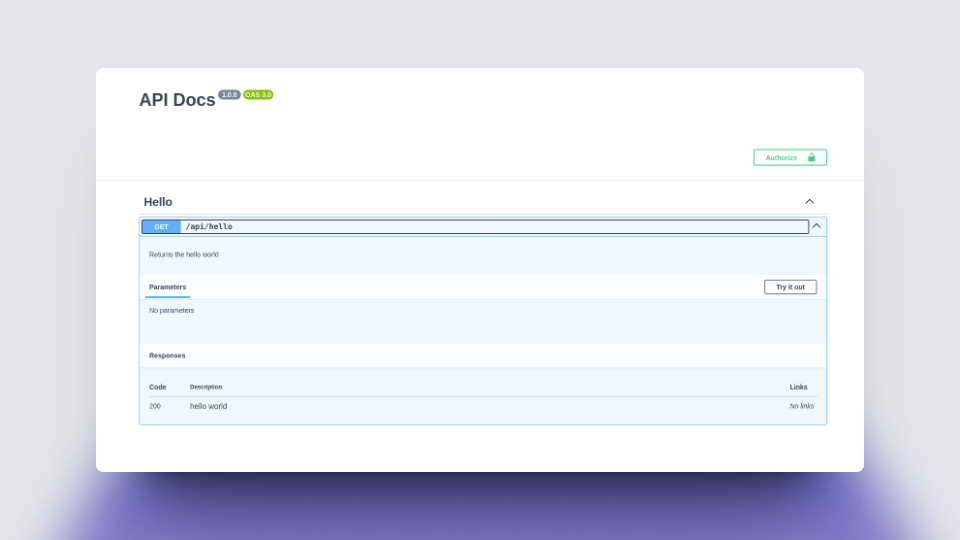
Now if you open http://localhost:3000/api you'll see the Swagger UI
I also setup an online demo where you can browser the file for reference.
If the above embed is not working, Here is the direct link to that.
I hope you find this article helpful. Let me know what you think in comments.